SPLUNK and REST API
How to Stream Twitter into Splunk in 10 Simple Steps ?
January 8, 2014/in Splunk /by Discovered Intelligence
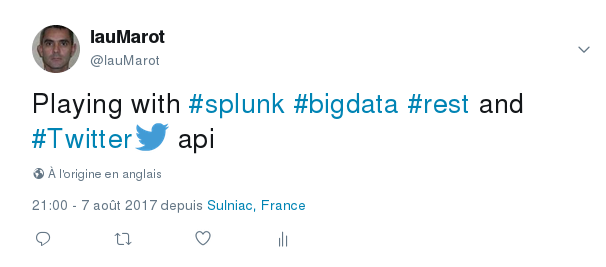
My Original Tweet
Many people talk about the need to index tweets from twitter into Splunk, that I figured I would write a post to explain just how easy it is.
Within 10 steps and a few minutes, you will be streaming real-time tweets into Splunk, with the fields all extracted and the twitter data fully searchable.
Assumptions
- Splunk is installed and running. If you don’t have Splunk, you can download it from http://splunk.com/download Splunk will run fine on your laptop for this exercise.
- You have a working Twitter account
The 10 Steps
1. Go to https://dev.twitter.com/ and log in with your twitter credentials
2. At the top right, click on “My applications”
3. Click on the “Create New App” button and complete the box for Name, Description and Website. You don’t need a callback URL for this exercise. Once you have completed these three fields, click on the “Create Your Twitter Application” button at the bottom of the screen.
4. Your application is now completed and we now need to generate the OAuth keys. You should see a series of tabs on the screen – click on the ‘API Keys’ tab. At the bottom of the screen when in the API Keys tab, click on the “Create my access token” button.
5. Wait about 30 seconds or so then click on the ‘Test OAuth‘ button at the top right of the screen. You should see all fields completed with cryptic codes. If you don’t, hit back, then click the ‘Test OAuth’ button again after another 30 seconds or so. Keep this page handy – we will need it in a couple of minutes.
6. Ok, now log into your Splunk environment search head, where we are going to install the free REST Api modular input application. Copy the following URL and replace mysplunkserver with whatever your splunk server name is, then click on the “Install Free” button.

Splunk REST Modular Input
https://mysplunkserver:8000/en-US/manager/search/apps/remote?q=rest+api.
If you are not using SSL/TLS, change it to http rather than https. You can alternatively install the application from the Splunk app store here: http://apps.splunk.com/app/1546/
7. Click on the button to “Restart Splunk” after installation of the app.
8. This app adds a new data input method to Splunk called REST. Once logged back into Splunk, click on “Settings” (top right) then “Data Inputs” from the Settings menu.
9.The Data Inputs screen will be displayed and you will see a new data input method called REST. Click on this link, then click on the “New” green button to bring up a new REST input configuration screen.
10. Ok, last step! We are going to complete the configuration details to get our Twitter data. I have only included the fields you need to configure and everything else can be left blank, unless you need to enter in a proxy to get out to the internet.
> REST API Input Name: Twitter (or whatever you want to call the feed)
> Endpoint URL: https://stream.twitter.com/1.1/statuses/filter.json
> HTTP Method: GET
> Authentication Type: oauth1
> OAUTH1 Client Key, Client Secret, Access Token, Access Token Secret: Complete from your Twitter Developer configuration screen in Step 5 above.
> URL Arguments: track=#bigdata,#splunk^stall_warnings=true
The above URL arguments are examples. In this case, I am selecting to bring in tweets that contain the hashtag of #bigdata and #splunk. I am using the ‘track’ streaming API parameter to do this. At this point, you should read here: https://dev.twitter.com/docs/streaming-apis/parameters#track. Also note, that if you want to track multiple keywords, these are separated by a comma. However, the REST API configuration screen expects a comma delimeter between key=value pairs. Notice that I have used a ^ delimiter instead, as I need to use commas for my track values.
> Response Type: json
> Streaming Request: Yes (ensure the box is checked)
> Request Timeout: 86400
Here we are setting the timeout to be 86400 seconds which is the number of seconds in a day. As long as you have at least one tweet come through per day, then you will be ok. If the timeout window is less than the amount of time between tweets streaming in, then the data input will timeout and not recover without re-enabling the input or I would imagine a Splunk restart.
> Delimeter: ^ (or whatever delimeter you used in the URL arguments field)
> Set Sourcetype: Manual
> Sourcetype: Tweets (or whatever sourcetype name you want)
> More Settings: Yes (check the box). Optionally provide a host name and an index you want the tweets to go into. The default index is main.Note: For reference, the above configuration is stored in etc/system/local/inputs.conf
This is what the final screen will look like. Hit the “Save” button when everything looks good.
twitter_finalstep10
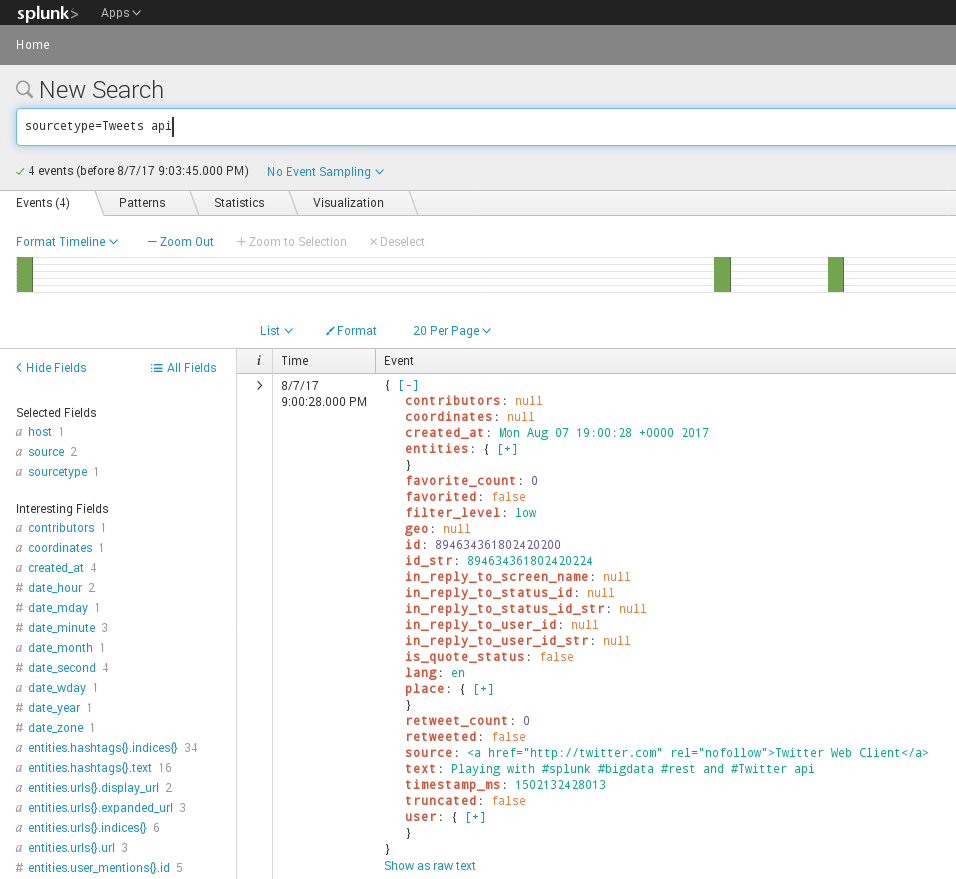
Search the Tweets!
You are all done! After hitting save, the tweets should start coming in immediately. Assuming you used a sourcetype of twitter, you can now go to the search bar in Splunk and run this query:
sourcetype=twitter earliest=-1h
You should see data coming in. You will notice that Twitter includes a TON of fields with each tweet – it is quite awesome actually. All the usernames, hashtags, users in the tweets, URLs (even translated URLs) are all extracted and searchable.
Of course, the above does simplify things. You should definitely read the the Twitter API documentation properly.
